Monthly Archives: April 2012

If you can’t make it to the Fairmont Banff Springs Hotel…

Standard
If you can’t make it to the Fairmont Banff Springs Hotel…

So if you can’t make it out to Banff this weekend for a taste-test of Executive Chef Martin Luthi’s amazing food, then perhaps you can try making it yourself at home! Yesterday I was catching up with one of my favourite daytime shows Live with Kelly (formerly Live with Regis and Kelly) on my PVR when I came across an amazing opportunity to share some great Canadian recipes from one of our country’s top vacation destinations – the Fairmont Banff Springs Hotel.

I actually had the pleasure of attending a conference at this amazing resort in the Canadian Rocky Mountains many years ago, and I have “stomach-etching memories” of eating at both the Banff Springs and the Chateau Lake Louise going back to 1981 when I first visited them as a child.

If you’ve never been to Banff National Park then you’ve totally got to put this place on your Bucket List! The whole town is SO gorgeous and the food is amazing – I could go on and on and on…

The incomparable and iconic Fairmont Banff Spring Hotel

You may not have caught Kelly’s latest weeklong trip away from New York City (where she is based) to Banff, Alberta, Canada – but she did an amazing job of showcasing Alberta to our American friends down South. In Winnipeg, we only get her show with our Time-Shifting cable subscription, but I always try to PVR it. On her last show from Banff on April 10th she featured the resort’s culinary team along with a selection of their top seven dishes utilizing Canadian sourced ingredients. Kelly’s tasting reactions along with those of Ben Mulroney (her co-host that day) really got me craving the Banff Springs Hotel’s creations.

I can’t wait to try a few of these great dishes myself here at home.
Hmmmm… which one to start with first? Maybe the Cheese Fondue?

Using Gruyère & Emmentaler cheeses for that dusty, rarely used Fondue Set that no one seems to admit to owning...

So in case you missed it, click the links below to try out these great recipes for yourself…

Salmon Bouillabaisse
Cheese Fondue
Alberta Beef Carpaccio
Elk Tenderloin With Black Trumpet Mushrooms
Bison Short Ribs With Barely Risotto, Seasonal Root Vegetables, Birch Syrup Glaze
Rainbow Trout with Squid Ink Cavatteli, Swiss Chard and Mussel Butter
Maple Dessert Recipes

For images of each of these dishes, please visit Chad Rubel’s Blog: Balance of Food
as the show didn’t include the yummy images from the TV segment along with the above recipe links.

WHICH RECIPES WILL YOU TRY???
_______________________________________________________________________________________

The Salmon Bouillabaisse is actually part of the Fairmont’s Lifestyle Cuisine Plus menu selections, and Chef Luthi stated that the caloric count for that particular figure-friendly dish was about 350 calories. It’s SO refreshing to see high-end restaurants incorporating delicious meals designed around guests’ diet-dependent requirements. Fairmont’s program now includes the following accommodations for their dining guests:

Diabetes
Heart disease or high blood pressure
Celiac disease (cannot tolerate gluten) or gastrointestinal disorders
Food allergies or sensitivities

As part of Lifestyle Cuisine Plus, we also cater to those following more specialized diets, such as:

Vegan
Raw food
Macrobiotic

_______________________________________________________________________________________

I, myself cannot wait to get back to the Banff Spring Hotel very very soon to “eat my heart out”! See you again soon Banff – one of the most beautiful places in Canada.

What is at the top of the list for your choice for the most beautiful place in Canada?
Please feel free to share your comments below…

Mini Banana Bread Loaves (and mini muffins)

Standard
Mini Banana Bread Loaves (and mini muffins)

Happy Belated Easter! I had the pleasure of hosting my octogenarian Father for his annual Spring visit. It was an opportunity for The Not So Desperate Housewife to transform into the Overachieving Daughter – can anyone else relate? I so enjoyed spoiling my Father! We don’t see him throughout the Winter months as neither of us like to drive the 5 hours on the Trans-Canada Highway through temperamental (and unpredictable) Winter weather conditions.

This 82-year old man is an amazing individual (I’m not just saying that because he’s my Dad), and I can only hope that in another 40 years that I have half as much energy, verve and get up and go as my Dad does. As an added bonus, we had the pleasure of viewing Dad’s Spring 2012 Abstract Painting Collection which he tucked into his minivan. Now with these 43 original pieces of art my next endeavour is to host an Art Show & Giveaway featuring these latest works with 100% of the proceeds benefiting the United Way of Winnipeg. It’s part of my family’s giving back belief system in a charity for which my mother and myself worked for many years. For more information about the Monday, April 30th Art Show at Joe Black Coffee Bar (and to view all the paintings available), please visit www.ColeshawArtGallery.com

John Coleshaw demonstrating his art while teaching his first Abstract Painting class in Winnipeg - April 7, 2012

But this blog is about food and not art…

For the past 6 days I have spent many, many, maaaannnnyyy hours in the kitchen creating a variety of meals for my husband and Father to celebrate the Easter holiday. We don’t have a lot of traditions or ‘must have’ foods like some families, so the menus were pretty easy to plan as the boys are quite easy to please. Some of the foods that we enjoyed included:

  • Cookies: Chocolate Bourbon Balls, Peanut Butter Kisses, and Snickerdoodles
  • Lemon Meringue Pie
  • Poppy Seed Cake
  • Blueberry Muffins
  • Borscht
  • Plum-Glazed Pork Tenderloin Kebabs
  • Hot Wings
  • Prime Rib & Yorkshire Pudding
  • Sun-dried Tomato Hummus
  • Hoisin-Soaked Turkey Meatballs!!!

But by special request my Father asked me to make him some of my Banana Bread pointing to a bunch of overripe bananas on my counter – waste not, want not… And I realized that I’ve taken up the reins from my mother who began using this recipe in the early 80’s (before passing away in 1989), and that it’s become a family favourite over the years.

Unfortunately I didn’t take all the traditional blog photos along the way as the boys had taken the camera on their pilgrimage to the Winnipeg Art Gallery to see the Norman Rockwell exhibit. So a fancier, end-product photo will have to do this time…

Next time try creating different shapes from your usual Loaf recipes. These Minis make for easier individual consumption for those who live alone

Our Family’s Favourite Banana Bread Recipe

Yield: 2 regular loaves, or 10 mini loaves AND 24 mini muffins

2 cups Sugar

1 cup Butter

6 Over-ripe Bananas, mashed (about 3 cups)

4 Eggs, well beaten

2-1/2 cups Flour

2 tablespoons Baking Soda

1 teaspoon Salt

1 teaspoon Apple Pie Spice

1 cup each of Optional Additions – Golden Raisins, Chopped Walnuts, Chopped Pecans

___________________________________________________________________

1. Preheat oven to 350*F

2. With Kitchenaid Mixer, cream butter until light and fluffy, add sugar and beat for about a minute

3. Add mashed bananas and beaten eggs – combine til well mixed

4. Measure dry ingredients into large measuring cup and gradually add it to your wet ingredients

TIP: Do NOT over-mix, or you will end up with bricks for muffins – this is a quick bread, so only combine ingredients until your flour disappears

As for the Optional Additions… I split the batch in half and did the First Batch of Mini Loaves three ways. A half-pan of plain for my husband (he’s picky), then folded in some walnuts for a half pan just for me, and then added raisins to produce some extra-special ones for my Pops. Then with the Second Batch of Mini Muffins, I did a half pan of raisin, and a half pan of raisin-pecan. If you plan it right you can keep this all to just one bowl AND please everyone, while creating many variations on the theme. To identify them later I put an “indicator” (i.e. raisin for the raisin versions) on top of each loaf/muffin before baking.

5. Spray baking pans of your choice with Pam, or lightly greased with butter – I don’t like using muffin liners anymore

6. Add batter to pans until they are 3/4 full

TIP: Once again I pull out my “Martha” medium-sized gelato scoop to use for uniform mini muffins

7. For baking: two regular loaves will take 45 minutes to 1 hour. For mini loaves bake about 22 minutes. For mini muffins bake approximately 13 minutes.

8. Test with a toothpick for doneness before removing from the oven.

9. Cool on wire racks.

TIP: These freeze beautifully! And I prefer to freeze the mini versions on a cookie sheet before placing into a Ziploc bag.

From my Family to yours… I hope that this recipe becomes a favourite that you too bake regularly!

You too can make Creme Brulee at home – it’s super easy!

Standard
You too can make Creme Brulee at home – it’s super easy!

My husband’s #1 favourite dessert has always been Creme Brulee, and a couple of years ago after being together for almost a decade I decided to teach myself how to make it for him as a birthday surprise. And it’s REALLY simple actually!!! With just 4 ingredients, and a bit of patience, you too can be enjoying this overpriced restaurant dessert at home. Don’t be daunted… it’s super easy to make!

The first two steps in creating at-home Creme Brulee can be a bit costly…

1. You need to buy yourself a good Brulee Torch. Yes, you can technically use a normal everyday blowtorch I suppose, however… you need a very, very delicate hand. A better idea is to invest in a kitchen-friendly torch that you can actually store in one of your kitchen drawers. We picked up a Fox-Run torch from a local kitchen store for about $30. They run on butane by the way, so don’t forget to pick some of that up too as they do not come pre-filled and ready to go. AND… PLEASE READ YOUR TORCH AND BUTANE INSTRUCTIONS CAREFULLY BEFORE USING.

2. You will also need ramekins (see below). You can usually pick up a basic set of 12 for under $20. OR you can opt for the fancier, restaurant-style, shallow ramekin (not shown) which can run you about $3 each.

You only require a pot, a whisk, and a stand or hand-held mixer – in a pinch you could even hand-whisk too

Always buy fresh eggs for ease of separating, and leave them at room temperature for 30 minutes
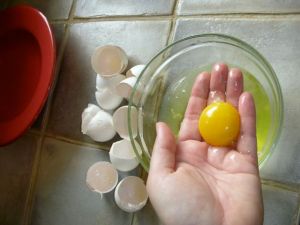
Using your hands is even easier than using a tool for separating eggs
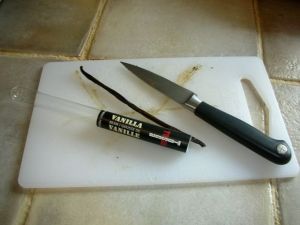
Use a light hand when scraping your vanilla bean and avoid the husk/skin – you just want the easy to scrape seeds

Add your vanilla bean scrapings to cream and heat gently
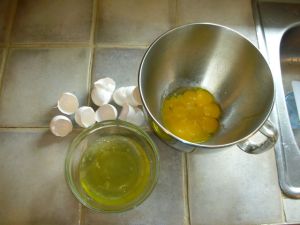
Hubby’s 2nd favourite dessert is Lemon Meringue Pie, so I always plan to make it the next day so that I can use up the leftover egg whites. Egg shells get crushed a bit and added to our compost pail – waste not, want not

If you are using a mixer be careful not to over-froth your mixture. Mix low and slow

Another advantage to using normal-sized ramekins is that they fit perfectly in a 9×13 baking pan for their water bath

Creme Brulee doesn’t expand, so you can fill the ramekins to the top for more yummy goodness in each dessert

You can cut down the cook time by placing two water baths side by side. No need to bake separately in a normal oven, just allow some space between the pans
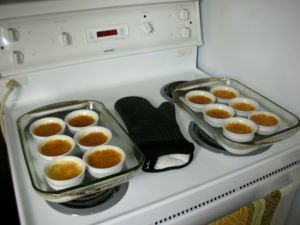
If you bake without covering the pans with foil they will come out this dark. Sometimes I use foil to distinguish the variations in flavour for half the batch
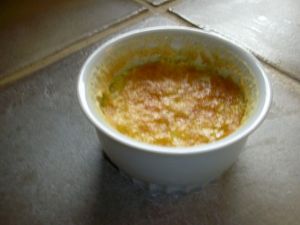
See how much they shrink in the ramekin. Make sure you fill them right up, and be careful how foamy you get your mixture

Creme Brulee BEFORE the torch – Sorry I forgot to take AFTER photos because Hubby was too excited to eat his dessert right away – next time I’ll try to snap some…

This is the recipe that I use – it’s is a pretty standard one…

FOR THE CREME:
9 egg yolks
3/4 cup superfine white sugar (i.e. Roger’s Berry Sugar)
1 L whipping cream
1 vanilla bean

FOR THE BRULEE:
1 tablespoon of superfine white sugar per ramekin (i.e. 6-12 tbsp)

My How-To’s

1. Preheat your oven to 325 degrees F.

2. Carefully separate egg yolks from their whites using either an egg separator, or your hand.

PLANNING TIP: Hubby’s 2nd favourite dessert is Lemon Meringue Pie, so I always plan to make it the next day so that I can use up the leftover egg whites – waste not, want not! Place your leftover egg whites in a sealed container in the fridge for tomorrow’s healthier egg-white omelets, or for any type of meringue project.

3. Using a paring knife, split your vanilla bean down the middle length-wise, scraping out the seeds with the back of your knife.

BY-PRODUCT BONUS: If you also cut your leftover vanilla bean in half width-wise you can then add it to a bottle of vodka. Shake the mixture daily for a week, and leave it at room temperature to infuse the alcohol and make homemade vanilla vodka. I love using this for making my chocolate-martinis!

4. Pour your whipping cream into a medium-sized saucepan over medium heat, and add your vanilla bean scrapings, whisking often.

5. Bring cream to a brief simmer, but do not boil the cream or it will overflow and make a mess of your stove-top.

6. While your cream is heating, use your mixer and a large bowl to cream together the 9 egg yolks and 3/4 cup superfine sugar until the mixture is pale yellow and thick.

7. Remove your saucepan from the heat when the liquid is hot to your fingertip touch.

8. Very gradually add the hot vanilla cream into your yolk and sugar mixture on a low-speed setting or while also using a whisk.

NOTE: Do not add your hot cream too quickly, or the eggs will cook and you’ll have to start again. Slow & steady wins the race!

9. Spoon the custard into clean, dry ramekins. I like to fill each ramekin to just below the top rim as they do shrink down about a 1/2 inch.

10. To make a water bath, place ramekins in a roasting pan or 9×13 baking dish, and fill the pan with enough warm water to come halfway up the sides of the ramekins.

11. Bake uncovered for about 35 to 40 minutes (depending on your oven) until the custard is barely set around the edges – it should still have a tiny bit of jiggle.

NOTE: You may want to cover the pan loosely with foil to prevent over-browning either right from the start or about halfway through.

12. Remove pans from the oven, and then remove each ramekin from its’ water bath. Cool to room temperature, about an hour.

13. Transfer all of the ramekins to your refrigerator, and chill for at least 2 hours. And I’ve even kept Creme Brulee in the fridge up to 4 days uncovered, because there is no way that Jeff and I can eat 12 Creme Brulees in one day! Though Jeff would love to try I’m sure.

TIP: Our torch likes to sit and rest for about 30 minutes after it’s filled, so plan ahead when you’re ready to fire it up.

14. To Brulee: Sprinkle 1 tablespoon of the superfine sugar into each chilled ramekin, ensuring that it is evenly spread over the custard.

15. Hold your torch slightly above the sugary surface to gently brown the sugar. With patience it will form a nice even, lightly-browned crust.

JEFF’S TIP: My hubby is best at doing the brulee work actually, and he suggests moving the flame in a circular motion around the inside edges of the ramekin and then back and forth through the middle so that the crust is evenly caramelized. This may take a little practice to get it just right… just remember you need to MELT the sugar, without burning it.

16. Allow each ramekin to cool slightly, but serve the dessert at once. I like to include some fresh raspberries on the side.

YIELD: 12 ramekins, as shown

FAQ’s

First let me reiterate that I am not a professionally-trained chef, nor do I attest to being an accomplished pastry chef. I’m just a very “curious cook” who enjoys trying new culinary adventures.

Can you use vanilla extract? Yup probably. The classic Creme Brulee only uses vanilla for flavouring, so I usually try to hunt down a REAL Vanilla Bean. Thankfully they are getting easier and easier to find at your local grocery store these days for about $6 for two beans.

Do you need to use such a high-fat dairy product to make Creme Brulee? Honestly, I’ve always assumed that heavy cream in a recipe means  35% whipping cream. But I’m sure that you could use Half & Half, or a lower fat product. However it IS dessert, and it’s not like you’re making this every day or every week. So in our household – it’s a calorie splurge. Enjoy!

What variations are possible with this recipe? You’re only limited by your taste preferences and imagination as there are also many variations on the traditional Creme Brulee. In the past I have personally tried other versions using…

– Dark Chocolate (3 oz. good quality shavings added to warm cream on stove-top),

– Orange Peel (3 slices of organic orange peels allow 15-30 minutes of additional steeping time),

– Liqueurs such as Frangelico or Grand Marnier by simply ‘spiking’ half the batch with an ounce or two.

Plus I have tried Chai Creme Brulee too during my chai-obsessed phase at some restaurant and it was yummy too. There is also Ginger, Green Tea, Cinnamon, Coffee, Maple, Lime, etc. etc. etc. – go ahead and use your imagination and your favourite flavour(s)!

However, ol’ fashioned vanilla is still my hubby’s #1 favourite, though I may have to one day try Glenlivet Scotch in a batch and see what he thinks – hmmmm

Please let me know what variations you’ve tried by sharing them in the Comments section below!

*********************************************************************************************************
Now that I have mastered one dessert fav… tonight I’ll be attempting my first ever Dark Chocolate Souffle
courtesy of Ciao! Magazine’s article on Pastry Chef Richard Warren of Winnipeg’s Fort Garry Hotel.

Hopefully mine come out as nice as these… fingers crossed – we shall see!