Tag Archives: easy

Mexi-Chicken Crescent Rolls

Standard

So I took the plunged and picked up some Pillsbury Crescent Rolls during my weekly grocery excursion. And today I decided was the day to finally make an attempt at one of Pinterest’s most Pinned recipes using the crescent rolls.

These Mexi-Chicken Crescent Rolls were SO delicious, and got two thumbs up from my husband!

These Mexi-Chicken Crescent Rolls were SO delicious, and got two thumbs up from my husband!

As I love all things Mexican, it seemed a
natural choice to create a Mexi-Chicken stuffing.

These were so easy and quick to make for a simple Saturday lunch. I hope you enjoy them as much as we did.

These were so easy and quick to make for a simple Saturday lunch. I hope you enjoy them as much as we did.

Mexi-Chicken Crescent Rolls

(makes 8 rolls)

1 tube Grands Pillsbury Crescent Rolls

1 Chicken Breast, uncooked

½ cup Spicy Clamato Juice (or Tomato Juice)

2 tbsp. Spicy Salsa

¾ cup Light Mayo

1/3 cup Sharp Cheddar Cheese, fine-grated

1/8 cup Jalapeno Peppers, minced
Taco Seasoning

Salt & Pepper

____________________________________

  1. Slice your chicken breast into strips.
  2. Cook the chicken slices in non-stick frying pan (no oil) for 3 minutes each side. Sprinkle ½ tsp. of each – taco seasoning, salt and pepper over the slices.
  3. When flipping the chicken, add the salsa and juice to the pan. Cook for 2 more minutes.
  4. Remove chicken from pan, and dice it into very small bite-sized pieces, and let cool.
  5. Preheat oven to 375*F.
  6. Mix together mayo, cheese, jalapenos, and cooled chicken pieces in a bowl, add a bit of the cooked salsa/tomato liquid for flavour, about 1 tbsp will do the trick.
  7. Open and unwrap your crescent rolls. Cut each triangle length-wise to form two, long triangles.
  8. Place one teaspoon of your chicken mixture on the wider end of each triangle. I like to use my “Martha” gelato scoop for this step.
  9. Roll up each triangle from wide to narrow end, and place on a cookie sheet with Silpat or sprayed with Pam cooking spray. I sprinkled my crescent rolls with poppy seeds for decoration.
  10. Bake for 14 minutes. Remove and let cool for 5 minutes. And enjoy!

This made for a very impressive lunch for hubby and I yesterday. I’ll definitely be making these again. Finally I understand what all the fuss was about on Pinterest in regards to these stuffed crescent rolls.

What do you use Pillsbury Crescent Rolls for?
Please feel free to share your Comments below.

3-2-1 Mug Cake: A Super Easy Mid-day Dessert

Standard

I love cake, don’t you? I just don’t love all the dishes it takes to bake one. And with just the two of us… one cake is WAAAAAY more than we need to eat in any given week.

Earlier in the year I found out about how to make Mug Cake at home. Now I can make CakeFor1 or two, and here’s how you can too!

Take one Betty Crocker Super Moist Cake Mix and one Betty Crocker Angel Food Mix in any flavours or combinations you want. I chose chocolate, but we’ve already used up the vanilla! Mix them together in a large resealable container.

So simple! Mix together two cake mixes and have it ready to go - anytime.

So simple! Mix together two cake mixes and have it ready to go – anytime.

1. Use a regular sized coffee mug.

2. Add 3 tablespoons of your “Mug Cake Mix”.

Easy Chocolate Mug Cake in 3-2-1

Easy Chocolate Mug Cake in 3-2-1

3. Add 2 tablespoons of water, and stir until combined with a spoon or small whisk.
You could also use milk or any liquid I’m sure.

4. Microwave on high for 1 minute.
Caution… don’t try to bake more than 2 mugs at a time though.

Microwave for just one minute and voila! You've got cake.

Microwave for just one minute and voila! You’ve got cake.

5. Let cool for one minute, but be ready to eat it right away as it does not like to hang around to be eaten later.

6. Garnish with whatever you have on hand. I used white chocolate chips and chocolate sundae syrup.

7. Tuck your container of 3-2-1 Mug Cake Mix back in your cupboard for future use.

An amazingly simple dessert that even a non-baker can make in minutes

An amazingly simple dessert that even a non-baker can make in minutes

Suggestions for garnishes and flavour combinations…

* Use vanilla cake, strawberries and whipped cream from a can to create very fast Strawberry Shortcakes. Also great with ANY fruit or berry!
* Use prepared icing, which keeps so well in your fridge, to frost your Mug Cake.
* If you have an Epicure Selections Frother, you can make thick, fat-free whipped cream out of Skim Milk. Flavour it with any liqueur you have on hand, like Frangelico.
* Add bananas, butterscotch and a small scoop of ice cream for a unique Sundae-style Mug Cake.
* Use canned cherry pie filling, chocolate whipped cream and chocolate shavings to create a Black Forest Mug Cake.

How will you top your Mug Cake?
Please feel free to share your own personal combinations below.

Anna’s Kitchen Tip #3 – Oven-Baked Basmati Rice

Standard

Here’s a super easy way to make Basmati rice
turn out perfect every time – ON time!

Pre-heat your oven to 350*F.

Using a covered, oven-safe dish, stir 2 cups of basmati rice
into 4 cups of lukewarm water.

I prefer using a flat covered dish like my favourite Corning Ware. Makes it very easy to put away after it cools too.

I prefer using a flatter, covered dish like my retro Corning Ware piece. Makes it very easy to put away after it cools too.

Stir in 1 teaspoon of salt, and add 1 tablespoon of butter.

Bake covered at 350*F for 45 minutes.

Fluff & serve.

This makes enough for two people for 3 meals.

We eat one, and then I freeze two batches for an easy side later.

BTW I love adding a cup of cooked frozen peas to my basmati rice!

Hubby’s Home Sick Today Soup

Standard

So my dear husband, who never ever calls in sick… is home sick today with a bad head cold. Our pups, who wanted to be featured today are so accommodating and work great as “nurses”! We just have to call “nap time” and they are right there to cuddle.

Jeff in bed with his Dog Nurses - Toby & Mitzie

Jeff in bed with his Dog Nurses – Toby & Mitzie

I was feeling bad for my hubby last night when he went to bed at 830pm, so I prepped some homemade soup and tucked it away – just in case.

My interpretation of Italian Wedding Soup

My interpretation of Italian Wedding Soup

1/2 Spicy Italian Sausage, raw

12 Baby Carrots, chopped

1 Celery Stalk, chopped

3 cups Broth (any kind)

2 tablespoons Pasta Stars

1 tablespoon Minced Onion, dried

3 cloves Fresh Garlic, minced

2 tablespoons Lime Juice

1 teaspoon Veggie Spice Blend

Salt & Pepper to taste

____________________

1. Bring the broth to a boil.

2. Add vegetables, and cook for 5-10 minutes.

3. Remove the sausage’s casing and pinch off 1/2 inch ‘meatballs’, adding them to the boiling broth as you go. Cook for another 5-10 minutes.

Aim for a very small, bite-size meatball

Aim for a very small, bite-size meatball as it will cook better and faster for you

4. Add pasta stars and cook another 5-10 minutes. Squeeze in some lime juice at the end to finish.
NOTE: This time I didn’t cook them separately, and the stars got very large and plump overnight. Thankfully, I didn’t lose too much broth liquid.

5. Cool to room temperature, and place in fridge overnight to amaze someone the next day with a quick to reheat lunch.

6. Serve with a great slice of artisan bread. This one I slathered with my tummy-tempting, homemade chevre cheese and sun-dried tomatoes.

Italian Wedding Soup with Flax Artisan Bread spread with Sun-dried Tomato Chevre Cheese

Italian Wedding Soup with Flax Artisan Bread spread with Sun-dried Tomato Chevre Cheese

And for dessert… Deb’s Whipped Shortbread cookies. I had one, and Mr. Sicko had THREE! But more about all our cookie options following yesterday’s Cookie Monster Christmas Cookie Exchange on another LunchFor1 Post.

Our #1 favourite Christmas Cookie - Whipped Shortbread

Our #1 favourite Christmas Cookie – Whipped Shortbread

Jeff was VERY patient in waiting for me to photograph his LunchFor1 today! Thanks honey – feel better soon.

What do you like to eat when you’re feeling under the weather?
Please feel free to share your ideal comfort food in the Comments section.

Simple Soup for One

Standard

I arrived home famished after volunteering at Koats for Kids Winnipeg this morning.

Faux Minestrone-a Simple Soup for 1

Having no plan for lunch (ergo nothing to blog about) I saw that I had some stock defrosted in the fridge from supper last night. And after grabbing a few veggies from the crisper, I was able to quickly whip up this very delicious “Minestrone” soup on the fly.

Simple Soup for One Ingredients

Whatever you have on hand is fine

Whatever you have on hand is fine

2-3 cups Broth
1 Carrot, chopped
1 Celery stalk, chopped

1/8 Onion, chopped

1 clove Garlic, minced

1 tsp. Lemon zest

1 tbsp. Sun-dried tomatoes, finely chopped

1 tsp. Dill, dried

2 tbsp. Pasta, cooked

1 tsp. Salt

Tiny Pasta Stars are a quick and easy addition to any soup

Tiny Pasta Stars are a quick and easy addition to any soup

TIP: When I buy a grocery store rotisserie chicken for our Chicken Taco night, I use all the meat I want from the bird, and then put the bones in a small pot of boiling water with 1/2 tsp each of salt, pepper and dried parsley. I boil it for about an hour while my husband and I eat dinner. And once it’s cooled, I put it in a storage container, and freeze it for days like today. No more buying expensive, sodium-heavy, pre-made chicken stock!

_____________________________________________________

1. I boiled the broth in one pot, and cooked the pasta in another. Once the pasta was done, I ran it under cold water and kept it in my strainer. I find that adding grains or pasta to soups makes them thicken up very quickly from the starch content.

You do not need a lot of broth, about 2 cups is good.

2. Add whatever vegetables you’ve got in the fridge to the broth, and pick one or two “wow” ingredients like lemon zest or sun-dried tomatoes. Whatever you have on hand is fine – black beans, peppers, potatoes, etc., even quinoa or rice in place of the pasta.

3. Cook for about 20 minutes, or until the veggies reach your preferred tenderness. And voila! You have an easy homemade soup for one. Or up-size this idea to feed a crowd at any time of the day.

4. Serve in a pretty bowl to warm your day! And feel good about this healthy, low-calorie, but filling lunch choice.

A spoonful of goodness!

A spoonful of goodness!

What is your favourite soup?

Please let me know in the comments section below what your “wow” ingredients were when you tried this recipe.

Quick Italian Sausage Sloppy Joes

Standard

Thank you Johnsonville for bringing out loose-form Italian Sausage meat! I don’t know about you… but I always detested having to take the sausage meat out of the casings. Here’s a quickie 5-minute meal, and my quickly written blog post.

5-Minute Italian Sausage Sloppy Joes with Feta and Dill Pickles

5-Minute Italian Sausage Sloppy Joes with Feta Cheese and Dill Pickles on the side

I had defrosted this spicy sausage meat last night, and used about half of it on our homemade pizza. It added just the right zing!

However, I was left with about half a package to cook up today along with some thinly sliced onions. Now… what to make for lunch?

I was inspired to create a twist on one of my favourite, childhood  lunches – Sloppy Joes. Typically, I use ground beef and Heinz’s Chili Sauce to make mine on toasted buns. But today… I tried something different.

In a nutshell, here’s what I did…
1. Place meat in fry pan, and use your potato masher to break it up.

2. Add the sliced onions, and fry together with a squeeze of Sriracha and Worcestershire Sauce.

3. Slather Toasted Garlic and Horseradish Dip on the buns.

A new find while traveling last summer from Robert Rothschild Farm.

A new find while traveling last summer from Robert Rothschild Farm.

4. Top the buns with the cooked meat and onion mixture, and feta (mine was homemade – salty-goodness).

5. Serve with a side of dill pickles. I like to crinkle-cut mine!

Best thing I ever bought at Ikea - a veggie crinkle cutter.

Best thing I ever bought at Ikea – a veggie crinkle cutter.

Hope you love it as much as I do!

How do you make your Sloppy Joes?
Please feel free to share in the comments section below.

Learn how to make your own cheese from scratch,
check out my instructor’s easy-to-follow RECIPES.

Hamburger Soup & Roasted Garlic Buns

Standard

For lunch a couple of days ago, I pulled this soup out of my freezer for a quickie meal with a girlfriend who was dropping by, just in case she needed some sustenance on her Errand-Running Day. But it ended up being LunchFor1, and I had a blessed bowl of comfort after a busy, and somewhat stressful, morning. This recipe makes a nice, hearty soup that is perfect for enjoying with a big group, or to make ahead and freeze for future use. This was my #1 Choice as the go-to soup that my husband and I made a couple months ago in the days following my surgery. And it froze so wonderfully!

It’s been such a chilly week here in the middle of Canada, but it’s supposed to warm up for the weekend – YEAH!

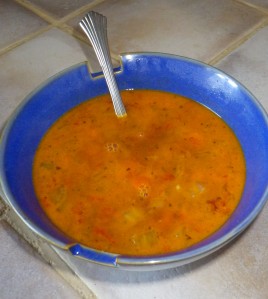
A Spoonful of Comfort – Hearty Hamburger Soup

I REMEMBER…

I first had this soup about 30 years ago, and you’d think because I can remember exactly who made, when, and why, that I would have been making it every Winter for the past 30 years – NOPE. I only recently tracked it down again thanks to an old friend of mine (Thanks Shelley). And now that I’ve adapted it, I would like to share it with you, because it’s also inspiring my newly created blog – LunchFor1.com. Follow me on Twitter @LunchFor1 for easy meals that are good eats any time of the day!

But, back to the story…

There I was a 10-year old figure skater on test day, both nervous and hungry, and in need of a little, quick comfort. The nice lady at the rink’s canteen, Eleanor, had made a batch of Homemade Hamburger Soup for all of the hungry, little tikes to eat while we waited our turn before the judges.

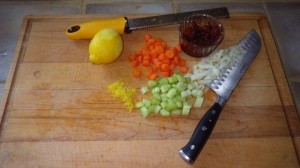
All these years later, I still remember the heartiness and the smoothness of this soup, as well as the yummy chewiness of the barley. The key to this soup is spending the time to cut the veggies up into a fairly small pieces – 1/4″ to 1/2″ dice. The soup was a like a hug, and it’s stuck with my taste buds for these past three decades!

And for a great side-dish to this meal…

It’s a smart idea, at this or any time of the year, to keep a few Roasted Garlic heads in your fridge for these “lunch emergencies”. It was super easy for me to pull out the pre-roasted garlic head from the fridge, pop the cloves out, and quickly mash them up in order to dress up my lunch selection with an upscale spread.

Better than butter is this Roasted Garlic Spread made from mashed roasted garlic cloves - much healthier too!

This Roasted Garlic Spread is better than butter, and much healthier too!

From time-to-time, when you’ve got the oven roasting something, simply take a whole head of garlic, chop off the top portion, and place it on a piece of tin foil. Then I pour 1 teaspoon of Olive Oil on the garlic, add a pinch of sea salt, and grind some fresh pepper over it. Then I wrap it up in the tin-foil, and set it in the oven to roast for about 45 minutes. Then let it cool and slide it (tin foil and all) into a storage baggie, and place it at the back of your fridge for future use.

Or, for creating a big-batch of Roasted Garlic check out my Stove-Top Roasted Garlic post from March 2012.

But back to the star of this post – the soup… here’s the recipe…

Anna’s Hearty Hamburger Soup

1 1/2 pounds Extra Lean Ground Beef
(or 700g of any ground meat of your choice)
1 Yellow Onion, minced
3 cloves Garlic, minced
1  can Diced Tomatoes (28 oz./840mL)
2 cups Hot Water
3 cans Beef Consomme or Broth (30 oz./ 900mL)
1 can Tomato Soup (10 oz./ 300mL)
4 Carrots, 1/4″ dice
1 Bay Leaf
3 stalks Celery, diced
2 tbsp. Dried Italian Seasoning
1 tsp Black Pepper
1/2 cup Pot Barley

1. Boil water in a small pot. Add 1/2 tsp. salt, and 1/2 cup Pot Barley. Cook for 30 minutes. Drain and add to soup.

TIP: I prefer to cook my barley separate from my soups so that my soups
do not get overly thick from the barley’s starch.

2. Dice all the vegetables.

TIP: However, I like to mince my onions and garlic in my food processor so that
it becomes very fine – it’s much faster and easier that way.

3. Brown the beef, onions and garlic in large stock pot.

4. Add the liquids and tomatoes, and bring it all to boil.

5. Add all of the vegetables, and spices.

6. Cook for another 1/2 hour (or more), and serve with Mashed Roasted Garlic Spread and fresh buns.

It’s SOOOO good that you should probably plan to make a double batch,
and freeze some for an easy lunch on another chilly day!

What is your favourite soup to use for comfort on a cold day? Please feel free to share your comments below.

Taking an old favourite 'upscale' with a fancied-up dinner roll.

Taking an old favourite ‘upscale’ with a fancied-up dinner roll.

This soup isn’t your ‘cup of tea’?
Check out the other soup ideas that I’ve Pinned on Pinterest.

Watch for my next post on Homemade Chevre Cheese!

It takes SO little to make your own Chevre cheese at home.
An expensive indulgence for much less than you would think!
STAY TUNED THIS WEEKEND!

Aside

Anna’s Kitchen Tips 2012

Instead of keeping your pound of butter whole in the fridge, cut it into 1 tablespoon sized cubes (approximately).

Then you can easily add a pat of butter to your fry pan for sauteing vegetables, or to melt over top fresh asparagus.

My hubby likes to steal one to melt in a ramekin in the microwave to drip over his popcorn.

Pre-cutting your 1lb. of Butter
saves you time and clean up

Save Time | Save Energy | Save Space | Save Clean Up Time | Save Yourself Hassles

Anna’s Kitchen Tip #1